Saturday, November 7, 2009

INDEX SQL / PLSQL DATABASE CONNECTIVITY


SQL/ PLSQL PROGRAMS


Create Queries
View Querie
Insert Querie
DELETE Querie
Update Querie
Select Querie
Sub Queries
JOIN Querie
Outer JOIN Querie
GRANT
REVOKE
High level language extensions – PL/SQL
Control Flow in PL/SQL
Cursor
Implicit Cursors
Explicit Cursors
To use Explicit Cursor
To access an Explicit Cursor
PL/SQL Procedures
Execute a Stored Procedure
PL/SQL Functions
Execute a PL/SQL function

Database Connectivity


Step to create Database Connectivity (Visual Basic with Oracle)
Step-I Create Table in Oracle

Step – II Create Data Source (Click on Step )


Step - 1
Step - 2
Step - 3

Step –III Database Connectivity ( Click on Step)

Step – 1
Step - 2
Step - 3
Step - 4
Step - 5
Step - 6
Step -7
Step - 8
Setp -9

Database Connectivity

Database Connectivity


Step to create Database Connectivity (Visual Basic with Oracle)


Step-I Create Table in Oracle


Step – II Create Data Source (Click on Step )

Step - 1
Step - 2
Step - 3


Step –III
Database Connectivity ( Click on Step)

Step – 1
Step - 2
Step - 3
Step - 4
Step - 5

Step - 6
Step -7
Step - 8
Setp -9

Create Data Source Step - 1


Step 1


Click On


Start


Control Panel


Administrative Tools


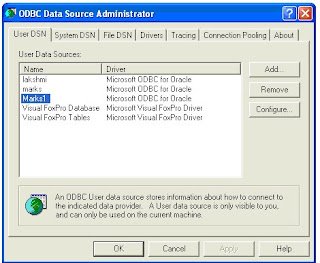
Data Source (ODBC)

Click On Add Button

Create Data Source Step - 2

STEP - 2


Select - Microsoft ODBC for Oracle

Then

Click On the Finish Button


Create Data Source Step - 3

Step 3


Type into Data Source Name Field (Data Source Name is user define Name)

Type into User Name Field (User Name is SCOTT )

Type into Server Field ( Server Name is ORAMCA) Whatever You have Server Name give that Name


Click On Ok Button


Step – III Connect Database


Step - 1


Open Visual Basic 6.0 – Standard EXE Form

Database Connectivity Step - 2

Step -2


Select Project from Tool Bar
and next Select Components
ADODC Component will be Displayed on ToolBox


Database Connectivity Step - 3

Step -3


Select Microsoft ADO Data Control 6.0 (SP4)(OLEDB)

Click On Apply Button from Components Screen

ADODC Components will be Display on the ToolBox Left side on the VB Screen

Just Click On the ADODC Components and Track on the VB Form


Database Connectivity Step - 4

Step - 4

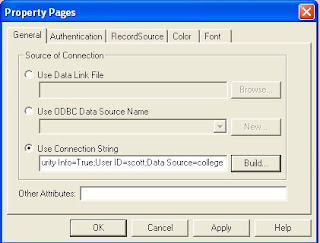
Right Click on the ADODC Control and Click On ADODC Properties


Database Connectivity Step - 5

Step - 5


Click On the Build Button

Database Connectivity Step - 6

Step -6

Select - Microsoft OLE DB Provider for ODBC Drivers


Click On the Next Button


Database Connectivity Step -7

STEP - 7


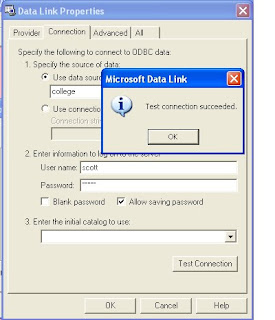
Select Data Source Name

For example College


Database Connectivity Step - 8

STEP - 8


Type User Name : Scott

Type Password: Tiger

Click On Allow Saving Password (Check Box) and

Click on the Test Connection Button

Click on OK Button from Microsoft Data Link and

Click on OK Button from Data Link Properties


Data Source will be Connected


Database Setp -9

Database Connectivity
Step -9

Select Record Source from Property Page

Select Command Type – 2 - adCmdTable

Select Table - Table Name ( for example ACCOUNT )

Click On Apply Button and

Click On the OK Button


Index

Queries for SQL / PLSQL


Create Queries
View Querie
Insert Querie
DELETE Querie
Update Querie
Select Querie
Sub Queries
JOIN Querie
Outer JOIN Querie
GRANT
REVOKE
High level language extensions – PL/SQL
Control Flow in PL/SQL
Cursor
Implicit Cursors
Explicit Cursors
To use Explicit Cursor
To access an Explicit Cursor
PL/SQL Procedures
Execute a Stored Procedure
PL/SQL Functions
Execute a PL/SQL function

Create Queries


CREATE

Syntax


CREATE TABLE "table_name"
("column 1" "data_type_for_column_1",
"column 2" "data_type_for_column_2", ... )


So, if we are to create the customer table specified as above,


CREATE TABLE customer
(First_Name char(50),
Last_Name char(50),
Address char(50),
City char(50),
Country char(25),
DOB date)

View Querie

VIEWS

Say we have the following table:


TABLE Customer


(First_Name char(50),
Last_Name char(50),
Address char(50),
City char(50),
Country char(25),
Birth_Date date)


and we want to create a view called V_Customer that contains only the First_Name, Last_Name, and Country columns from this table,


CREATE VIEW V_Customer
AS SELECT First_Name, Last_Name, Country
FROM Customer


Now we have a view called V_Customer with the following structure:


View V_Customer
(First_Name char(50),
Last_Name char(50),
Country char(25))


SELECT * FROM V_Customer

Insert Querie

INSERT

Syntax


INSERT INTO "table_name" ("column1", "column2", ...)VALUES ("value1", "value2", ...)

Assuming that we have a table that has the following structure,

Table Shop

and now we wish to insert one additional row into the table representing the sales data for Kumar on January 10, 1999. On that day, this store had $900 in sales. We will hence use the following SQL script:


INSERT INTO Shop (store_name, Sales, Date)
VALUES ('Kumar', 900, 'Jan-10-1999')


The second type of INSERT INTO allows us to insert multiple rows into a table. Unlike the previous example, where we insert a single row by specifying its values for all columns, we now use a SELECT statement to specify the data that we want to insert into the table.


INSERT INTO "table1" ("column1", "column2", ...)
SELECT "column3", "column4", ...
FROM "table2"

DELETE Querie


DELETE

Sometimes we may wish to get rid of records from a table. To do so, we can use the DELETE FROM command.
The syntax for this is
DELETE FROM "table_name"
WHERE {condition}

It is easiest to use an example. Say we currently have a table as below:

Table Shop


and we decide not to keep any information on Kumar in this table. To accomplish this, we type the following SQL:

DELETE FROM Shop
WHERE store_name = "Kumar"

Now the content of table would look like

Table Shop


Update Querie


UPDATE


Once there's data in the table, we might find that there is a need to modify the data. To do so, we can use the


UPDATE command. The syntax for this is
UPDATE "table_name"
SET "column_1" = [new value]
WHERE {condition}


For example, say we currently have a table as below:

Table Shop


and we notice that the sales for Kumar on 01/08/1999 is actually $500 instead of $300, and that particular entry needs to be updated. To do so, we use the following SQL:

UPDATE ShopSET Sales = 500
WHERE store_name = "Kumar"
AND Date = "Jan-08-1999"

The resulting table would look like

Table Shop


In this case, there is only one row that satisfies the condition in the WHERE clause. If there are multiple rows that satisfy the condition, all of them will be modified. If no WHERE clause is specified, all rows will be modified.

It is also possible to UPDATE multiple columns at the same time. The syntax in this case would look like the following:

UPDATE "table_name"
SET column_1 = [value1], column_2 = [value2]
WHERE {condition}

Select Querie

SELECT
Syntax

SELECT "column_name" FROM "table_name"

To illustrate the above example, assume that we have the following table:

Table Shop


To select all the stores in this table, we key in,


SELECT store_name FROM Shop


Result

store_name
Kumar
Devi
Kumar
Saritha


Multiple column names can be selected, as well as multiple table names.

Sub Queries

Sub Queries


It is possible to embed a SQL statement within another. When this is done on the WHERE or the HAVING statements, we have a subquery construct.
The syntax is as follows:
SELECT "column_name1"
FROM "table_name1"
WHERE "column_name2" [Comparison Operator]
(SELECT "column_name3"
FROM "table_name2"
WHERE [Condition])
[Comparison Operator] could be equality operators such as =, >, <, >=, <=. It can also be a text operator such as "LIKE".


Table Shop
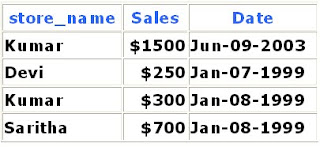

Table Graphy
and we want to use a subquery to find the sales of all stores in the South region. To do so, we use the following SQL statement:

SELECT SUM(Sales) FROM Shop
WHERE Store_name IN
(SELECT store_name FROM Graphy
WHERE region_name = 'South')
Result:

SUM(Sales)
2050
EXISTS simply tests whether the inner query returns any row. If it does, then the outer query proceeds. If not, the outer query does not execute, and the entire SQL statement returns nothing.

The syntax for EXISTS is:

SELECT "column_name1"
FROM "table_name1"
WHERE EXISTS
(SELECT *
FROM "table_name2"
WHERE [Condition])

Let's use the same example tables:

Table Shop
Table Graphy

and we issue the following SQL query:

SELECT SUM(Sales) FROM Shop
WHERE EXISTS
(SELECT * FROM Graphy
WHERE region_name = 'South')

We'll get the following result:

SUM(Sales)
2750


JOIN Querie

Table Shop


Table Graphy

and we want to find out sales by region. We see that table Graphy includes information on regions and stores, and table Shop contains sales information for each store. To get the sales information by region, we have to combine the information from the two tables. Examining the two tables, we find that they are linked via the common field, "store_name".

SELECT A1.region_name REGION, SUM(A2.Sales) SALES
FROM Graphy A1, Shop A2
WHERE A1.store_name = A2.store_name
GROUP BY A1.region_name

RESULT


The first two lines tell SQL to select two fields, the first one is the field "region_name" from table Graphy (aliased as REGION), and the second one is the sum of the field "Sales" from table Shop (aliased as SALES). Notice how the table aliases are used here: Graphy is aliased as A1, and Shop is aliased as A2. Without the aliasing, the first line would become

SELECT Graphy.region_name REGION, SUM(Shop.Sales) SALES

Outer JOIN Querie


OUTER JOIN

If we have to select elements in a table regardless of whether they are present in the second

table? We will now need to use the SQL OUTER JOIN command.

Let's assume that we have the following two tables,

Table Shop


Table Graphy


and we want to find out the sales amount for all of the stores. If we do a regular join, we will not be able to get what we want because we will have missed "New York," since it does not appear in the Shop table. Therefore, we need to perform an outer join on the two tables above:

SELECT A1.store_name, SUM(A2.Sales) SALES
FROM Graphy A1, Shop A2
WHERE A1.store_name = A2.store_name (+)
GROUP BY A1.store_name


Note that in this case, we are using the Oracle syntax for outer join.

Result:


GRANT

GRANT


SQL GRANT is a command used to provide access or privileges on the database objects to the users.

GRANT privilege_name
ON object_name
TO {user_name PUBLIC role_name}
[WITH GRANT OPTION];


• privilege_name is the access right or privilege granted to the user. Some of the access rights are ALL, EXECUTE, and SELECT.

• object_name is the name of an database object like TABLE, VIEW, STORED PROC and SEQUENCE.

• user_name is the name of the user to whom an access right is being granted.

• user_name is the name of the user to whom an access right is being granted.

• PUBLIC is used to grant access rights to all users.

• ROLES are a set of privileges grouped together.

• WITH GRANT OPTION - allows a user to grant access rights to other users.

For Eample

GRANT SELECT ON employee TO user1;This command grants a SELECT permission on employee table to user1.You should use the WITH GRANT option carefully because for example if you GRANT SELECT privilege on employee table to user1 using the WITH GRANT option, then user1 can GRANT SELECT privilege on employee table to another user, such as user2 etc. Later, if you REVOKE the SELECT privilege on employee from user1, still user2 will have SELECT privilege on employee table.

The REVOKE command removes user access rights or privileges to the database objects.

REVOKE

REVOKE


The Syntax for the REVOKE command is

REVOKE privilege_name
ON object_name
FROM {user_name PUBLIC role_name}


For Eample:

REVOKE SELECT ON employee FROM user1;This commmand will REVOKE a SELECT privilege on employee table from user1.When you REVOKE SELECT privilege on a table from a user, the user will not be able to SELECT data from that table anymore. However, if the user has received SELECT privileges on that table from more than one users, he/she can SELECT from that table until everyone who granted the permission revokes it. You cannot REVOKE privileges if they were not initially granted by you.

High level language extensions – PL/SQL

High level language extensions – PL/SQL


The plain SQL Program

CREATE TABLE Table1(

e INTEGER,

f INTEGER

);


DELETE FROM Table1;

INSERT INTO Table1 VALUES(1, 3);

INSERT INTO Table1 VALUES(2, 4);


The PL/SQL program


DECLARE

a NUMBER;

b NUMBER;

BEGIN

SELECT e,f INTO a,b FROM Table1 WHERE e>1;

INSERT INTO Table1 VALUES(b,a);


END;

.

run;


Fortuitously, there is only one tuple of Table1 that has first component greater than 1, namely (2,4). The INSERT statement thus inserts (4,2) into Table1.

Control Flow in PL/SQL

Control Flow in PL/SQL


Example 1


DECLARE

a NUMBER;

b NUMBER;

BEGIN

SELECT e,f INTO a,b FROM Table1 WHERE e>1;

IF b=1 THEN

INSERT INTO Table1 VALUES(b,a);

ELSE

INSERT INTO Table1 VALUES(b+10,a+10);

END IF;
END;
.
run;

Example 2

DECLARE

i NUMBER := 1;

BEGIN

LOOP

INSERT INTO Table1 VALUES(i,i);

i := i+1;

EXIT WHEN i>100;

END LOOP;

END;
.
run;

Cursor

Coursor


A cursor is a temporary work area created in the system memory when a SQL statement is executed. A cursor contains information on a select statement and the rows of data accessed by it. This temporary work area is used to store the data retrieved from the database, and manipulate this data. A cursor can hold more than one row, but can process only one row at a time. The set of rows the cursor holds is called the active set.


There are two types of cursors in PL/SQL:

Implicity Coursor
Explicity Coursor


Implicit cursors


These are created by default when DML statements like, INSERT, UPDATE, and DELETE statements are executed. They are also created when a SELECT statement that returns just one row is executed.


Explicit cursors


They must be created when you are executing a SELECT statement that returns more than one row. Even though the cursor stores multiple records, only one record can be processed at a time, which is called as current row. When you fetch a row the current row position moves to next row.


Both implicit and explicit cursors have the same functionality, but they differ in the way they are accessed.

Friday, November 6, 2009

Implicit Cursors

Implicit Cursors

When you execute DML statements like
DELETE
INSERT
UPDATE
SELECT
implicit statements are created to process these statements.

Oracle provides few attributes called as implicit cursor attributes to check the status of DML operations. The cursor attributes available are

%FOUND
%NOTFOUND
%ROWCOUNT
%ISOPEN.

For example

When you execute INSERT, UPDATE, or DELETE statements the cursor attributes tell us whether any rows are affected and how many have been affected. When a SELECT... INTO statement is executed in a PL/SQL Block, implicit cursor attributes can be used to find out whether any row has been returned by the SELECT statement. PL/SQL returns an error when no data is selected.

Attributes

%FOUN

Return Value

The return value is TRUE, if the DML statements like INSERT, DELETE and UPDATE affect at least one row and if SELECT ….INTO statement return at least one row.
The return value is FALSE, if DML statements like INSERT, DELETE and UPDATE do not affect row and if SELECT….INTO statement do not return a row.

Example

SQL%FOUND

Attributes

%NOTFOUND

Return Value

The return value is FALSE, if DML statements like INSERT, DELETE and UPDATE at least one row and if SELECT ….INTO statement return at least one row. SQL%NOTFOUND
The return value is TRUE, if a DML statement like INSERT, DELETE and UPDATE do not affect even one row and if SELECT ….INTO statement does not return a row.
Example

SQL%NOTFOUND

Attributes

%ROWCOUNT

Return Value

Return the number of rows affected by the DML operations INSERT, DELETE, UPDATE, SELECT SQL%ROWCOUNT

Example

SQL%ROWCOUNT
For Example:

Consider the PL/SQL Block that uses implicit cursor attributes as shown below:

DECLARE var_rows number(5);
BEGIN
UPDATE employee
SET salary = salary + 1000;
IF SQL%NOTFOUND THEN
dbms_output.put_line('None of the salaries where updated');
ELSIF SQL%FOUND THEN
var_rows := SQL%ROWCOUNT;
dbms_output.put_line('Salaries for ' var_rows 'employees are updated');
END IF;
END;

In the above PL/SQL Block, the salaries of all the employees in the ‘employee’ table are updated. If none of the employee’s salary are updated we get a message 'None of the salaries where updated'. Else we get a message like for example, 'Salaries for 1000 employees are updated' if there are 1000 rows in ‘employee’ table.

Explicit Cursors

Explicit Cursors


An explicit cursor is defined in the declaration section of the PL/SQL Block. It is created on a SELECT Statement which returns more than one row. We can provide a suitable name for the cursor.


The General Syntax for creating a cursor is as given below:


CURSOR cursor_name IS select_statement;


• cursor_name – A suitable name for the cursor.


• select_statement – A select query which returns multiple rows.

To use Explicit Cursor

How to use Explicit Cursor


There are four steps in using an Explicit Cursor.

• DECLARE the cursor in the declaration section.
• OPEN the cursor in the Execution Section.
• FETCH the data from cursor into PL/SQL variables or records in the Execution Section.
• CLOSE the cursor in the Execution Section before you end the PL/SQL Block.


1) Declaring a Cursor in the Declaration Section:

DECLARE
CURSOR emp_cur IS
SELECT *
FROM emp_tbl
WHERE salary > 5000;


In the above example we are creating a cursor ‘emp_cur’ on a query which returns the records of all the
employees with salary greater than 5000. Here ‘emp_tbl’ in the table which contains records of all the
employees.

2) Accessing the records in the cursor:

Once the cursor is created in the declaration section we can access the cursor in the execution section of the PL/SQL program.

To access an Explicit Cursor

How to access an Explicit Cursor

These are the three steps in accessing the cursor.

1) Open the cursor.
2) Fetch the records in the cursor one at a time.
3) Close the cursor.


General Syntax to open a cursor is:

OPEN cursor_name;

General Syntax to fetch records from a cursor is:

FETCH cursor_name INTO record_name;
OR
FETCH cursor_name INTO variable_list;


General Syntax to close a cursor is:

CLOSE cursor_name;

When a cursor is opened, the first row becomes the current row. When the data is fetched it is copied to the record or variables and the logical pointer moves to the next row and it becomes the current row. On every fetch statement, the pointer moves to the next row. If you want to fetch after the last row, the program will throw an error. When there is more than one row in a cursor we can use loops along with explicit cursor attributes to fetch all the records.

Points to remember while fetching a row:

• We can fetch the rows in a cursor to a PL/SQL Record or a list of variables created in the PL/SQL Block.

• If you are fetching a cursor to a PL/SQL Record, the record should have the same structure as the cursor.

• If you are fetching a cursor to a list of variables, the variables should be listed in the same order in the fetch statement as the columns are present in the cursor.

General Form of using an explicit cursor is:

DECLARE
variables;
records;
create a cursor;
BEGIN
OPEN cursor;
FETCH cursor;
process the records;
CLOSE cursor;
END;

Lets Look at the example below

Example 1:


1> DECLARE
2> emp_rec emp_tbl%rowtype;
3> CURSOR emp_cur IS
4> SELECT *
5> FROM
6> WHERE salary > 10;
7> BEGIN
8> OPEN emp_cur;
9> FETCH emp_cur INTO emp_rec;
10> dbms_output.put_line (emp_rec.first_name ' ' emp_rec.last_name);
11> CLOSE emp_cur;
12> END;


In the above example, first we are creating a record ‘emp_rec’ of the same structure as of table ‘emp_tbl’ in line no 2. We can also create a record with a cursor by replacing the table name with the cursor name. Second, we are declaring a cursor ‘emp_cur’ from a select query in line no 3 - 6. Third, we are opening the cursor in the execution section in line no 8. Fourth, we are fetching the cursor to the record in line no 9. Fifth, we are displaying the first_name and last_name of the employee in the record emp_rec in line no 10. Sixth, we are closing the cursor in line no 11.

PL/SQL Procedures

Procedures

A stored procedure or in simple a proc is a named PL/SQL block which performs one or more specific task. This is similar to a procedure in other programming languages. A procedure has a header and a body. The header consists of the name of the procedure and the parameters or variables passed to the procedure. The body consists or declaration section, execution section and exception section similar to a general PL/SQL Block. A procedure is similar to an anonymous PL/SQL Block but it is named for repeated usage.

We can pass parameters to procedures in three ways.

1) IN-parameters
2) OUT-parameters
3) IN OUT-parameters

A procedure may or may not return any value.

General Syntax to create a procedure is:

CREATE [OR REPLACE] PROCEDURE proc_name [list of parameters]
IS
Declaration section
BEGIN
Execution section
EXCEPTION
Exception section
END;


IS - marks the beginning of the body of the procedure and is similar to DECLARE in anonymous PL/SQL Blocks. The code between IS and BEGIN forms the Declaration section.

The syntax within the brackets [ ] indicate they are optional. By using CREATE OR REPLACE together the procedure is created if no other procedure with the same name exists or the existing procedure is replaced with the current code.

The below example creates a procedure ‘employer_details’ which gives the details of the employee.

1> CREATE OR REPLACE PROCEDURE employer_details
2> IS
3> CURSOR emp_cur IS
4> SELECT first_name, last_name, salary FROM emp_tbl;
5> emp_rec emp_cur%rowtype;
6> BEGIN
7> FOR emp_rec in sales_cur
8> LOOP
9> dbms_output.put_line(emp_cur.first_name ' ' emp_cur.last_name
10> ' ' emp_cur.salary);
11> END LOOP;
12>END;
13> /

Execute a Stored Procedure

How to execute a Stored Procedure?


There are two ways to execute a procedure.

1) From the SQL prompt.

EXECUTE [or EXEC] procedure_name;


2) Within another procedure – simply use the procedure name.

procedure_name;

PL/SQL Functions

A function is a named PL/SQL Block which is similar to a procedure. The major difference between a procedure and a function is, a function must always return a value, but a procedure may or may not return a value.

The General Syntax to create a function is:

CREATE [OR REPLACE] FUNCTION function_name [parameters]
RETURN return_datatype;
IS
Declaration_section
BEGIN
Execution_section
Return return_variable;
EXCEPTION
exception section
Return return_variable;
END;
1) Return Type: The header section defines the return type of the function. The return datatype can be any of the oracle datatype like varchar, number etc.
2) The execution and exception section both should return a value which is of the datatype defined in the header section.For example, let’s create a frunction called ''employer_details_func' similar to the one created in stored proc
1> CREATE OR REPLACE FUNCTION employer_details_func
2> RETURN VARCHAR(20);
3> IS
5> emp_name VARCHAR(20);
6> BEGIN
7> SELECT first_name INTO emp_name
8> FROM emp_tbl WHERE empID = '100';
9> RETURN emp_name;
10> END;
11> /


In the example we are retrieving the ‘first_name’ of employee with empID 100 to variable ‘emp_name’.
The return type of the function is VARCHAR which is declared in line no 2.
The function returns the 'emp_name' which is of type VARCHAR as the return value in line no 9.

Execute a PL/SQL function

How to execute a PL/SQL Function?


A function can be executed in the following ways.

1) Since a function returns a value we can assign it to a variable.

employee_name := employer_details_func;

If ‘employee_name’ is of datatype varchar we can store the name of the employee by assigning the return type of the function to it.

2) As a part of a SELECT statementSELECT employer_details_func FROM dual;

3) In a PL/SQL Statements like,dbms_output.put_line(employer_details_func);

This line displays the value returned by the function


Thursday, November 5, 2009

TABLE

SQL> CREATE TABLE test_null (id NUMBER);Table created.SQL> INSERT INTO test_null VALUES (1);1 row created.SQL> INSERT INTO test_null VALUES (2);1 row created.SQL> INSERT INTO test_null VALUES (NULL);1 row created.SQL> SELECT * FROM test_null;
ID---------- 1 2 -- The select count(*) shows 3 records SQL> SELECT COUNT(*) FROM test_null; COUNT(*)---------- 3-- select count(*) with a where clause, shows 2 records.SQL> SELECT COUNT(*) FROM test_null WHERE id > 0; COUNT(*)---------- 2-- select count(*) with a where clause, in this case shows one record.SQL> SELECT COUNT(*) FROM test_null WHERE id != 1; COUNT(*)---------- 1When we define a column to be NOT NULL that means it cannot have a NULL value assigned. This eliminates the problem of three valued logic very nicely, but may not always be possible when designing tables.
There are, of course, much more advanced features revolving around tables. Things like partitioning and index-organized tables are some advanced topics that you will want to look into once you are comfortable with the basics. Also, there are other types of constraints that we could deal with like foreign key constraints. Finally, in earlier versions of Oracle you had to deal with physical storage characteristics related to the table. Thankfully, Oracle Database 10g takes care of a number of the physical storage requirements for you. Many other advanced topics exist that you can research in advanced Oracle DBA books.

Oracle Concepts

Creating TablesBefore tables can be used, they have to be created and this is generally the job of the DBA. Creating tables is done with the create table command. The create table command does the following:
* Defines the table name
* Defines the columns in the table and the datatypes of those columns
* Defines what tablespace the table resides in (optional)
* Defines other characteristics of the table (optional)
Let’s look at the create table command in action:
Connect scott/tiger CREATE TABLE books ( book_id NUMBER PRIMARY KEY, book_name VARCHAR2(30), author_name VARCHAR2(40), book_isbn VARCHAR2(20) )TABLESPACE users;In this example, we create a table called BOOKS which has 4 columns. The first column is BOOK_ID which is a NUMBER datatype. This means we will be storing numbers in this column. Did you notice on the line where we define the column BOOK_ID, that we included the word primary key?
This is known as an in-line constraint because we are defining the constraint on the same line as the column associated with the constraint. In this case the keyword primary key means we are defining a primary key constraint on the BOOKS table called PK_BOOKS.
What is a primary key constraint? A constraint is a rule that is applied to the table. In this case, the primary key constraint is a rule is says can’t have a duplicate entry in the BOOK_ID column, and the BOOK_ID column can never be empty or “null.” In this example, each book has a unique BOOK_ID assigned. In other words, War and Peace might have a BOOK_ID of 12345, and no other book will ever have the same BOOK_ID column value.
You might say, why not just make the title of the book the primary key. The answer is that you might have a number of different books called War and Peace. One might be paperback and one might be hardcover. One might be out of print, one might be an easy to read child’s version. Hence, the title of the book isn’t a good candidate to uniquely identify the book. In this case then, we have a column called BOOK_ID that will be unique for each book. It then becomes the primary key. Since this isn’t a book about designing databases, that’s enough on primary keys for now.
You should know that in Oracle each primary key column must be unique. Thus, we can’t have two books with a BOOK_ID of 12345, Oracle would reject the second attempt to use that BOOK_ID and return an error to the user.
You can also define a combination of columns to be the primary key. This is known as a concatenated primary key. These kinds of constraints are defined as out-of-line constraints because they are defined on their own line in the create table statement.
Here is an example of the creation of an out-of-line primary key constraint. In this case our books table might well have multiple BOOK_ID’s. Hence, we will add a sequence number column (BOOK_ID_SEQ) to act as a “tie breaker”. Both columns in this example
CREATE TABLE books ( book_id NUMBER, book_id_seq NUMBER, book_name VARCHAR2(30), author_name VARCHAR2(40), book_isbn VARCHAR2(20), CONSTRAINT pk_books PRIMARY KEY (book_id, book_id_seq) )TABLESPACE users;Once you create a table, you can use the SQL*Plus desc command to see its structure as seen in this example:
SQL>desc books Name Null? Type ----------------------------------------- -------- ------------ BOOK_ID NOT NULL NUMBER BOOK_ID_SEQ NOT NULL NUMBER BOOK_NAME VARCHAR2(30) AUTHOR_NAME VARCHAR2(40) BOOK_ISBN VARCHAR2(20)

Oracle connection

Oracle Connection String


Oracle ODBC connection strings

Open connection to Oracle database using ODBC


"Driver= {Microsoft ODBCforOracle};Server=Your_Oracle_Server.world;Uid=Your_Username;Pwd=Your_Password;" Oracle OLE DB & OleDbConnection (.NET framework) connection strings
Open connection to Oracle database with standard security:
1. "Provider=MSDAORA;Data Source= Your_Oracle_Database;UserId=Your_Username;Password=Your_Password;"2. "Provider= OraOLEDB.Oracle;Your_Oracle_Database;UserId=Your_Username;Password=Your_Password;"
Open trusted connection to Oracle database


"Provider= OraOLEDB.Oracle;DataSource=Your_Oracle_Database;OSAuthent=1;"

database

database